TiniInstaller - Say Good Bye to JavaKit!
This is the home page of TiniInstaller, a
user-friendly GUI that simplifies the installation
and configuration of software on your TINIs.
Table of Contents
- Introducing TiniInstaller
- System Requirements
- How to Get TiniInstaller
- Documentation
- Troubleshooting
- Version History
- Licensing
Introducing TiniInstaller
Return to Table of Contents
TiniInstaller is a user-friendly GUI that
simplifies the installation and configuration
of software on your TINI. TiniInstaller offers
these simplifying features...
- During the installation process, TiniInstaller
allows you to specify the file containing
the TINI OS firmware (typically,
tini.tbin).
- Performs diagnostics on your javax.comm installation
and reports any problems using informative
and helpful messages.
- Allows you to specify your TINI's network
configuration in an easy-to-use GUI.
- Installs a complete working image into your
TINI's RAM. This image, also called a TINI
Package File, is a snapshot taken from an
existing (and working) TINI's memory. This
guarantees that your TINI will have the exact
same file system and heap as a working TINI.
- Ensures that the version of installed firmware
matches the version required by the TINI
Package File.
- Streamlines the installation process by installing
the TINI Package file included in TiniInstaller's
JAR file (if present).
TiniInstaller was created by Smart Software Consulting, which holds the copyright on it.
System Requirements
Return to Table of Contents
To use TiniInstaller, you must have:
- Java 2 SDK (or Runtime Environment), Standard
Edition (or greater).
- A TINI board with proper serial cable.
- The TINI 1.01 firmware either already installed or available
for installation.
- The TiniInstaller software (285 KB).
How to Get TiniInstaller
Return to Table of Contents
TiniInstaller is available from Smart Software Consulting. Simply go to the URL shown here:
http://www.smartsc.com/tini/TiniInstaller/THSInstaller.zip (285 KB)
The initial release of TiniInstaller is a
JAR file called THSInstaller.jar, which is the only file inside the THSInstaller.zip file. One way to extract THSInstaller.jar from THSInstaller.zip is to type...
jar xvf THSInstaller.zip
This JAR file includes not only TiniInstaller,
but also (as its name implies) a TINI Package
File that installs TiniHttpServer on your TINI with the /etc/.startup file already configured to start TiniHttpServer automatically when the system boots. The
TINI Package File included with THSInstaller.jar also installs TEd version 0.6.
The TINI Package File included with THSInstaller.jar is the only currently available TINI Package
File.
Documentation
Return to Table of Contents
TiniInstaller is designed to be very user
friendly, even newbie friendly. To run it,
simply type...
javaw -jar THSInstaller.jar
This will bing up a "wizard" dialog
box. The following table shows the rest of
the wizard pages, in sequence, along with
notes about each page.
If the "wizard" dialog box does
not appear, be sure that THSInstaller.jar in is your current directory (or specify
the full path to THSInstaller.jar instead of just THSInstaller.jar).
If you encounter an error message, please
check the Troubleshooting section below.
|
|
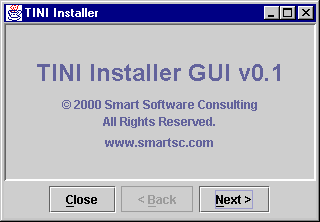
This is the inital page of TINIInstaller.
The buttons on the bottom are for naviagating
through TiniIinstaller.
- Clicking the "Next" button will
take you to the next page.
- Clicking the "Back" button will
take you to the previous page.
- Clicking the "Close" button will
close the program.
|
|
|
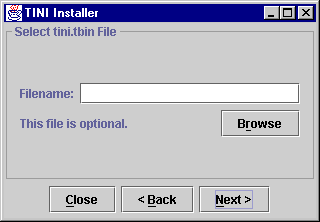
This page allows you specify a TINI Firmware
file to load, typically named tini.tbin.
This file is included in the TINI OS distribution.
TiniInstaller does not require this file.
If you leave the Filename field blank, TiniInstaller
will not (cannot) load the TINI Firmware.
It will, however, still check that the currently
installed firmware is the right version for
the TINI Package File being installed.
If you do specify a TINI Firmware file, TiniInstaller
will load it before checking that it is the
proper version for the TINI Package File
being installed. |
|
|
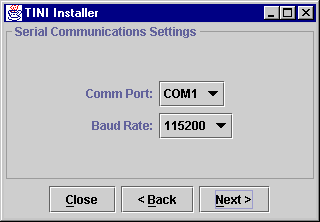
This page is where you can specify the communications
port and the baud rate to use when communicating
with TINI. |
|

|
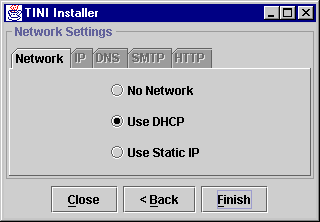
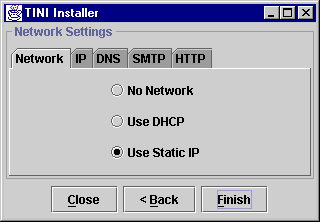
This page is where you specify the network
settings that you want your TINI to have.
The first tab, shown here, has three radio
buttons that you can choose: "No Network",
"Use DHCP", and "Use Static
IP". The other four tabs remain disabled
unless you choose "Use Static IP".
If you choose "No Network", TiniInstaller
will not configure any network settings on
your TINI and ou will have to communicate
with TINI via the serial port (typically
using JavaKit).
After making your selection, click on "Finish".
TiniInstaller will display the confirmation
dialog shown below. |
|
|
If you choose "Use DHCP", TiniInstaller
will configure your TINI to use DHCP. Notice
that the remains four tabs are disabled,
since all network configuration parameters
will come from the DHCP server.
After making your selection, click on "Finish".
TiniInstaller will display the confirmation
dialog shown below. |
|
|
If you choose "Use Static IP",
the other four tabs become enabled allowing
you to specify the static IP settings for
your TINI. At a minimum, you must specify
an IP Address and Subnet Mask (see next page).
After making your selection and providing
the information required/desired on the other
tabs, click on "Finish". TiniInstaller
will display the confirmation dialog shown
below. |
|

|
This page, available only if you selected
"Use Static IP" on the Network
tab, allows you to specify the IP address,
subnet mask, and default gateway for your
TINI. As shown here, you may specify addresses,
such as IP address and default gateway, using
hostnames instead of numeric IP addresses.
You may also use numeric addresses. TiniInstaller
will lookup the actual addresses before installing
to your TINI.
Since you selected "Use Static IP",
TiniInstaller will require you to specify
an IP address and a subnet mask. |
|
|
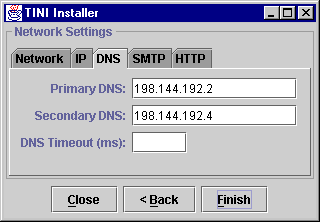
This page, available only if you selected
"Use Static IP" on the Network
tab, allows you to specify the DNS settings
for TINI. If you leave the "DNS Timeout
(ms)" field blank, the default, it will
be set to zero, which causes TINI to use
backoff/retry scheme. |
|
|
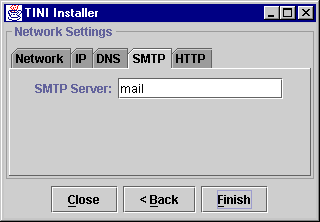
This page, available only if you selected
"Use Static IP" on the Network
tab, allows you to specify an SMTP server
that TINI will use for sending mail (typically
via a mailto: URL). This is required if you want to send
email from TINI (e.g. TiniHttpServer log
files). |
|
|
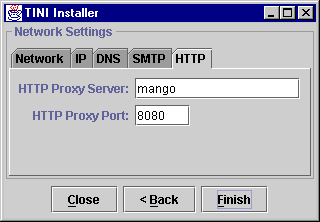
This page, available only if you selected
"Use Static IP" on the Network
tab, allows you to specify an HTTP Proxy
server and port which your TINI will use
for outbound HTTP requests. Note that these
settings are for HTTP requests from your TINI to external HTTP servers; they have nothing
to do with TiniHttpServer settings. |
|
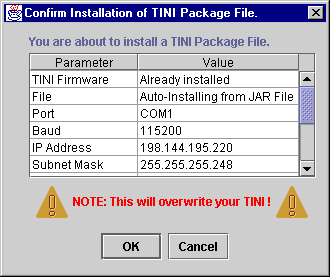
Be sure to heed the warning message!!!
TiniInstaller will overwrite every byte of
RAM on your TINI wiping out any and all previously
installed files!!!
|
This is the confirmation dialog displayed
after you click on the "Finish"
button.
The first line, TINI Firmware, shows the
name of the TINI Firmware file to load or,
as shown here, "Already installed".
"Already installed" means that
you did not specify a TINI Firmware file
to load, presumably because the TINI Firmware
is aready installed.
The second line shows the name of the TINI
Package file to install or, as shown here,
"Auto-Installing from JAR File",
which means that the TINI Package file to
be installed resides in the jar file from
which TiniInstaller is running.
The remaining lines show the other settings
you specified. Note that all IP addresses
are shown in numeric form.
Be sure to use the scroll bar to verify that
all of the settings are correct. If anything
needs to be changed, press "Cancel"
to be returned to the wizard pages.
If everything is correct, press "OK"
top begin the installation. |
|
|
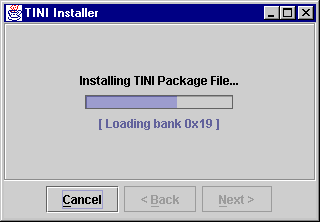
During the actual installation, a progress
meter is shown along with a status message.
If you specified a TINI Firmware File, the
progress meter will make two passes. The
first pass will say "Loading TINI Firmware..."
and count from bank 0x1 through bank 0x6.
The second pass (or only pass if you didn't
specify a TINI Firmware File) will say "Installing
TINI Package File..." and count through
banks 0x1 through 0x1f (or 0x27 if you have
a 1MB TINI).
You may press cancel at any time to abort
the installation, but TiniInstaller will
not respond until after finishing the current
page. Note, however, that aborting an installation
will leave your TINI in an indeterminate
state (i.e. probably unusable). |
|
|
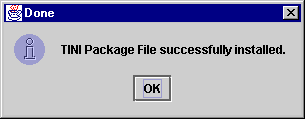
After the installation completes successfully,
the dialog box shown here will be displayed.
Clicking on OK will return you to the intial
page of the wizard, ready to install to another
TINI.
If you specified network settings (either
DHCP or Static IP) you should now be able
to access your TINI via telnet, FTP, and
HTTP using your web browser!!!
Since TiniInstaller defaults the timezone
to GMT, you will now have to reset the timezone
on your TINI if your timezone is not GMT. |
Troubleshooting
Return to Table of Contents
This section contains common error messages
and likely causes/solutions for each one.
If you don't see your error message listed
here, please send email to TiniInstallerHelp@smartsc.com with the exact wording of your error message.
|
Error Message
|
Likely Causes/Solutions
|
| No error message appears, but wizard does
not appear either. |
- Be sure that
THSInstaller.jar in is your current directory, or
- Specify the full path to
THSInstaller.jar on the command line instead of just THSInstaller.jar. For example...
javaw -jar c:\tini\smartsc\THSInstaller.jar
|
| "Failed to load Main-Class manifest
attribute from THSInstaller.jar" |
| "No response from TINI." |
- DTR signal is unjumpered on your TINI socket
board. Rejumper it. Check with your socket
board's manufacturer for details.
- Your serial cable is not passing the DTR
to TINI. Try a different serial cable. Note
that for PC to TINI communication, you need
to use a straight-through (i.e. modem) cable.
|
| "Unsupported loader version (...)" |
- Your TINI has on older (or newer) boot loader
than the one required by TiniInstaller. TiniInstaller
requires that your boot loader banner be
"TINI loader 05-15-00 17:45".
|
| "Incorrect firmware version on TINI." |
- Your TINI does not have the version of TINI
OS Firmware required by the TINI Package
File. Currently, you must have TINI OS 1.01
loaded (or have TiniInstaller load it for
you.)
|
| "Incorrect RAM size on TINI." |
- The TINI Package file you are trying to install
was made from a TINI with a different amount
of RAM than yours. Both 512KB and 1024KB
TINIs are supported by
THSInstaller.jar.
|
Version History
Return to Table of Contents
|
Version
|
Comments
|
|
0.1
|
» Initial release. |
Licensing
Return to Table of Contents
Smart Software Consulting holds the copyright to TiniInstaller and
THSInstaller.jar. TiniInstaller and THSInstaller.jar are made freely available for the sole purpose
of installing the included TINI Package File
onto your TINI. You may not use TiniInstaller
or THSInstaller.jar for any other purpose, including, but not
limited to, redistribution, sale, modification,
or reverse engineering, in whole or in part.
Copyright © 1999,2000,2001 Smart Software Consulting